This chapter describes the use of the export module for Credit Tools. This module can be used to create export files that contain debtor and invoice information in the format expected by Credit Tools. The following topics are covered:
Menu items: 'Export', 'Credit Tools'
Use the menu options mentioned above to open the export module for Credit Tools.
When the export module is opened, it is suggested to import the latest financial information. Always import this information if new entries were entered into the accounting package since the last time that information was imported into d-basics.
The following initial configuration is required:
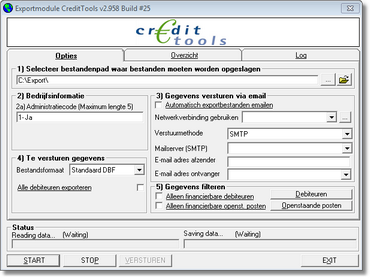
•Export directory
The export directory is the location where export files will be saved. The default location is: 'c:\export'. To select a different location, push the ![]() button at the end of the text box and browse to the desired location.
button at the end of the text box and browse to the desired location.
•Administration code
In the case of certain export formats the administration code is added to name of the export files. When one of these export file formats is selected, the text box 'Administration code' is activated. The administration code as used in Credit Manager must be entered into this text box.
•E-mail settings
D-basics can automatically attach export files to an e-mail and send them to an external credit manager. To send export files by e-mail, the following settings are required:
•Send automatically
If this option is checked, d-basics will automatically send an e-mail to the credit manager (recipient) each time new export files are created. The export files will be added as an attachment.
•Network connection
A mail server is used to send e-mail. Use this setting to specify which (dial up) network connection must be used to connect to this mail server.
Note: Do not select a network connection if internet is accessible through the local computer network (LAN). |
•Mail server
Enter the name or IP address of the (SMTP) mail server that must be used to send e-mail.
•E-mail address sender
Enter the e-mail address of a user that is allowed to send e-mail through the mail server mentioned before.
•E-mail address recipient
Enter the e-mail address to which d-basics must send the export files.
•Select export format
The Credit Tools export module can create export files in the following formats:
•Credit Tools txt
•Modint
•Standard DBF
•Standard TEXT
•Zwanenburg
The default format is 'Standard TEXT'. It is not possible to automatically process export files if they do not have the correct file format. Only select a different file format if specifically agreed upon with Credit Tools or your credit manager.
III. Creating and sending export files
To create export files, the following steps must be completed:
Step 1: Setting filters
Filters can be used to exclude information from export files. For more information see paragraph 'Using filters'.
Step 2: Creating export files
Push 'Start' to create export files. Before export files are actually created, d-basics performs the following checks:
•Are all required parameters set?
Required parameters that are missing or not entered correct are displayed in red. In order to proceed, the correct values must be entered.
•Are the country, language and currency codes matched to the corresponding ISO codes?
If the country, language or currency codes that are used in the accounting package are not compliant with the international ISO standard, these codes must be linked to the matching ISO codes before export files can be created. For information also see the paragraph Match ISO codes.
Notes: •Each time export files are created, d-basics checks whether all codes that are used in the accounting package are linked to the matching ISO codes. D-basics cannot create export files until all codes are linked with the matching ISO codes. •It is possible to schedule import and export actions.Also see 'Automatic import and export'. |
Step 3: Send or import export files
•Send export files
If credit management is outsourced, the export files created by d-basics must be send to the external credit manager. If the option 'Send automatically' is activated, the export files will be send to the credit manager immediately after they have been created. If the option 'Send automatically' is not activated, the button 'Send' must be pushed to send the export files.
•Import export files
If a local copy of Credit Manager is used for credit management, the export files created by d-basics must be imported into Credit Manager. See the Credit Manager manual for more information.
Step 4: summary and Log
After creating export files, the proceedings of d-basics can be reviewed:
•Summary
The second tab of the Export module shows a summary of the information that was retrieved from the ledger (administration) in the accounting package.
•Log
The third tab of the Export module shows the export log. The export log gives a summary of the events that took place during the import and export of information.
See the appendix 'Events log file' for an explanation of the events mentioned in the export log.
Notes: •Most of the errors mentioned in the log file can be fixed by changing the information in the ledger (administration) in the accounting package. •'Error- and Truncate events are only registered if the corresponding checkbox is checked. It is recommended only to use this feature for debugging purposes, since it has a negative impact on the performance of d-basics. |