This chapter describes the use of the export module for Fortis Commercial Finance Italy. This module can be used to create export files that contain debtor and invoice information in the format expected by Fortis Commercial Finance Italy. The following topics are covered:
Menu items: 'Export', 'IFITALIA'
An export module is used to carry out all the operations related to creating and sending data files.
Import information
When the export module is opened, it is suggested to extract the latest financial information from the accounting package. Always extract this information if new entries were entered into the accounting package since the last time that information was imported into d-basics. If export files created by the accounting package are used to import information into d-basics, always first create new export files before importing information into d-basics.
An export module must be configured before data files can be created, the following settings apply:
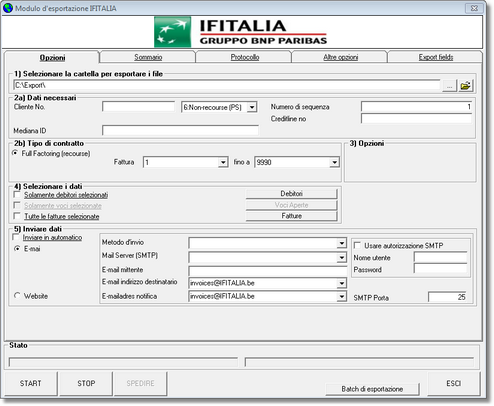
1. Export directory
The export directory is the location where the data files created by d-basics will be saved. The default location is: 'c:\export'. To select a different location, press the 'Browse' button - ![]() - at the end of the text box and browse to the desired location. Press the 'Open' button -
- at the end of the text box and browse to the desired location. Press the 'Open' button - ![]() - to open the location where the data files are saved.
- to open the location where the data files are saved.
Notes: •Data files created by d-basics are saved in the directory mentioned above. If the option 'Send automatically' is selected, the d-basics program will automatically upload these files once they are created. If this option is not selected, the process of uploading the files must be initiated manually by pushing the button "Send". •If data files have to be uploaded for more than one ledger (administration), it is recommended to create a different export directory for each ledger (administration). This to prevent uploading the wrong data files. •If the export directory that is entered does not exist, d-basics will try to create it automatically. |
2. Company information
The following information is needed to identify the sender of export files:
•Account number (also select account type using pull down menu)
•Mediana ID
•Creditline no
•Select export files
Depending on the type of factoring contract, d-basics can create two different sets of export files:
1) Data factoring files (outstanding items)
If the option Data factoring is selected the following export files will be created:
•A file containing debtor information
•A file containing outstanding items
2) Full factoring files (new invoices)
If the option Full factoring is selected the following export files will be created:
•A file containing debtor information
•A file containing new invoices
3. Select export files
In case of IFITALIA d-basics can create the following type of export files:
1) Full factoring files (recource)
If the option Full factoring is selected the following export files will be created:
•A file containing debtor information
•A file containing new invoices
4. Connection settings
The data files created by d-basics can be sent to the "Recipient" automatically. The following options can be set to arrange how these files are uploaded:
•Send automatically
If this option is selected data files will be sent to the "Recipient" automatically once they are created. If this option is not activated, sending the data files must be initiated manually by pressing the 'Send' button. This option is only available if an automatic upload is supported by the "Recipient".
•Connection method
There are four ways to send data files: automatically using e-mail, (S)FTP or a webservice or manually using an upload tool that is part of the website of the "Recipient". Being able to use these methods depends on if they are supported by the "Recipient". Usually a "Recipient" does not support all methods, those that are not supported will be hidden. To configure the connection settings, select the desired connection method and enter the related settings.
SETTINGS E-MAIL
Sending data files using e-mail requires the following settings:
oSending method
Select which method (SMTP or Outlook) must be used to send e-mail. The recommended method is "Outlook".
oMail server (applies to SMTP only)
Enter the name of IP address of the (SMTP) mail server that must be used to send e-mail. This is usually the mail server of the Internet service provider, but is is also possible to use a mailserver that is part of the company's computer network.
SMTP Authentication
If the mail server requires SMTP authentication, select the option 'SMTP authentication' and enter the username and password that must be used to log on to the SMTP server.
oE-mail address sender
Enter the e-mail address of the sender.
oE-mail address Recipient
Enter the e-mail address to which the data files must be sent.
oE-mail address Notification
When data files are sent, a notification e-mail can be sent to the person or department that is responsible for processing the new data files. To send notification e-mails enter the e-mail address to which the notifications must be sent.
UPLOAD INFORMATION MANUALLY
If the "Recipient" does not support automatic upload of information, data files must be uploaded manually through the website of the "Recipient". In this case select the upload method 'Website'. The website of the 'Recipient' will be opened automatically after the data files are created. In general a username and password is required to log on, these are provided by the 'Recipient".
III. Creating and sending export files
To create export files, the following steps must be completed:
Step 1: Import information
When the export module is opened, it is suggested to extract the latest financial information from the accounting package. Always extract this information if new entries were entered into the accounting package since the last time that information was imported into d-basics.
Step 2: Select new invoices
IFITALIA wants to receive data files that only contain those invoices that were created since the previous successful upload. D-basics keeps record of which invoices have already been uploaded and automatically selects the new invoices. The first and last invoice of the range selected by d-basics are displayed. This selection can be modified by selecting a different first or last invoice.
Step 3: Setting filters
Filters can be used to exclude information from the data files created by the export module. For more information see paragraph 'Using filters'.
Step 4: Create data files
After completing the previous steps, data files can be created by pressing the button 'Start'. Before actually creating the export files the following checks are carried out:
•Are all required parameters set?
Required parameters that are missing or not entered correctly are displayed in red. In order to proceed, the correct values must be entered.
•Are the country, language and currency codes matched to the corresponding ISO codes?
If the country, language or currency codes that are used in the accounting package are not compliant with the international ISO standard, these codes must be linked to the matching ISO codes before export files can be created. For more information see paragraph 'Match ISO codes'.
Notes: •Each time export files are created, d-basics checks whether all codes that are used in the accounting package are linked to the matching ISO codes. D-basics cannot create export files until all codes are linked with the matching ISO codes. •It is possible to schedule import and export actions. For more information see 'Automatic import and export'. |
Step 5: Send or upload data files
The data files created by d-basics can be sent to IFITALIA automatically or manually
•Automatic upload
The option to automatically send or upload data files is only available if the method "E-mail" is used to send information to IFITALIA. If the option 'Send automatically' is selected, files will be uploaded or sent automatically after they haven been created.
If the option 'Send automatically' is not activated, the button 'Send' must be pressed to sent or upload the data files created by d-basics .
•Manual upload
If the method "E-mail" cannot be used, data files must be uploaded manually using the upload tool on the website of IFITALIA. If the option 'Website' is selected, d-basics will navigate to the website of IFITALIA immediately after creating the data files.
Step 6: summary and Log
After creating export files, the proceedings of d-basics can be reviewed:
•Summary
The second tab of the Export module shows a summary of the information that was retrieved from the ledger (administration) in the accounting package.
•Log
The third tab of the Export module shows the export log. The export log gives a summary of the events that took place during the import and export of information.
See the appendix 'Events log file' for an explanation of the events mentioned in the export log.
Notes: •Most of the errors mentioned in the log file can be fixed by changing the information in the ledger (administration) in the accounting package. •'Error- and Truncate events are only registered if the corresponding checkbox is checked. It is recommended only to use this feature for debugging purposes, since it has a negative impact on the performance of d-basics. |